This article lists examples of how real assembly processes can be mapped with ipolog 4 Workspace. We refer to the Excel file that can be imported via Project Management -> Import Process xls. The values are example data in reference to the ipolog project, which is the basis of this article.
-
Retrieving and installing material from a container
-
Retrieving and installing material from the material pickup point
-
Retrieving and installing material from a cart
-
Installing material at the work position (pre-assembly)
-
Multiple workers
-
Tools
-
Material pick groups
-
Sequences
-
Multiple parts per operation (task / working cycle)
-
Synchronization point
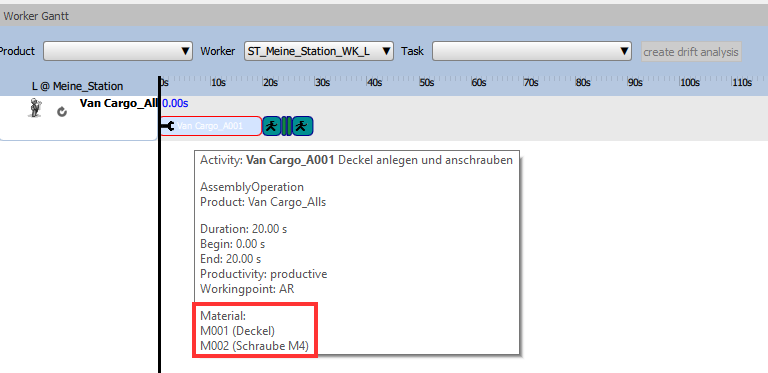
1. Retrieving and installing material from a container
| Column name | Value |
| Station | Meine_Station |
| Worker | L |
| Product | Cargo Van |
| Working cycle | A001 |
| Working cycle - description (optional) | Screws |
| Max duration [s] | 20 |
| Arrangement | left |
| Operating position | AR |
| Material | M001 |
| Material description (optional) | Screws M4 |
| Box type | 1211-KLT-GB-1040 |
| Box count | 1 |
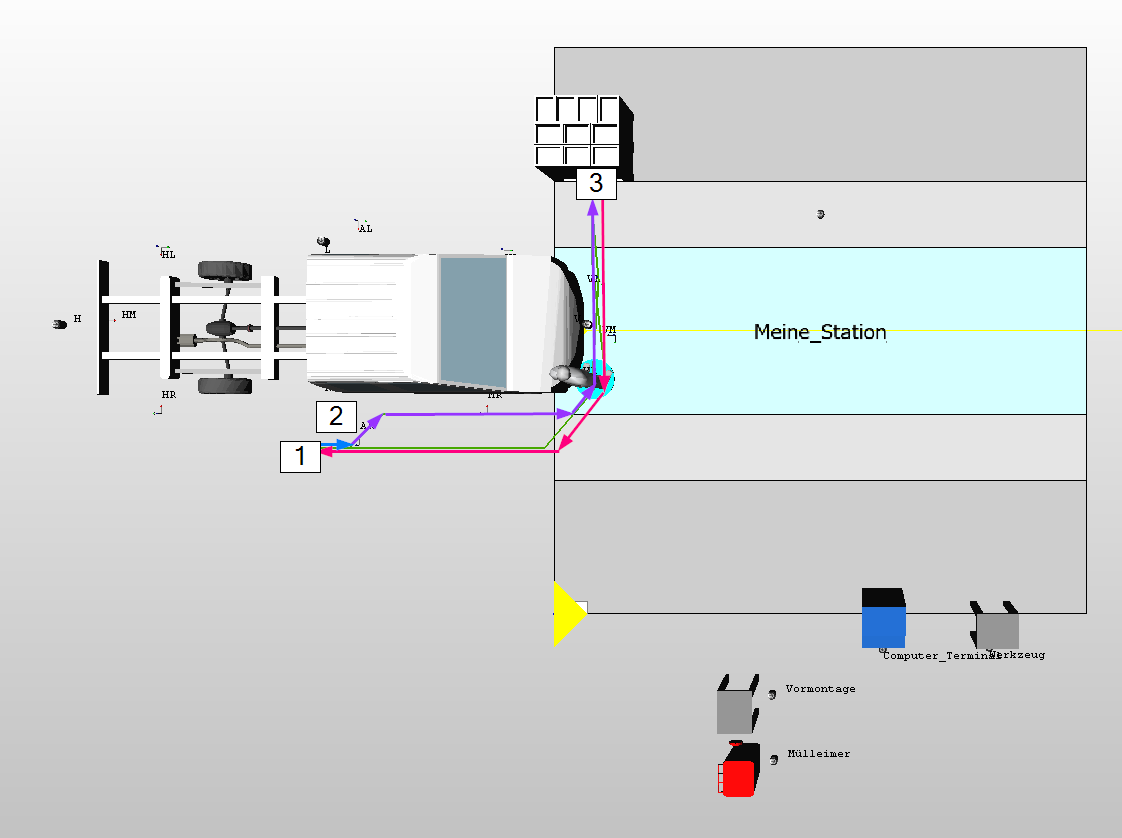
- The assembly line worker starts from the place where he installs the material – station (Meine_Station) and work position (Work position AR at the product). During the implementation of the task / Working cycle (A001) the worker walks with the product (blue line) for the max duration (s) (20 seconds).
- When all tasks for this cycle are completed, the worker retrieves the material for the next cycle. He walks (purple line) to the material (M001), which due to the configuration (left) is located on the left side of the station.
- The worker removes the material (M001) from the container (1211-KLT-GB-1040) and returns to the starting point (magenta line) so that he can immediately start again with the next cycle.
2. Retrieving and installing material from the material pickup point
| Column Name | Value |
| Station | Meine_Station |
| Worker | Worker |
| Product | Cargo Van |
| Working cycle | A002 |
| Working cycle - description (optional) | print and attach label |
| Max duration [s] | 150 |
| Arrangement | right |
| Operating position | AR |
| Material | M002 |
| Material description (optional) | Label |
| Pick time [s] | 20 |
| pick point (of the Material) | Computer_Terminal |
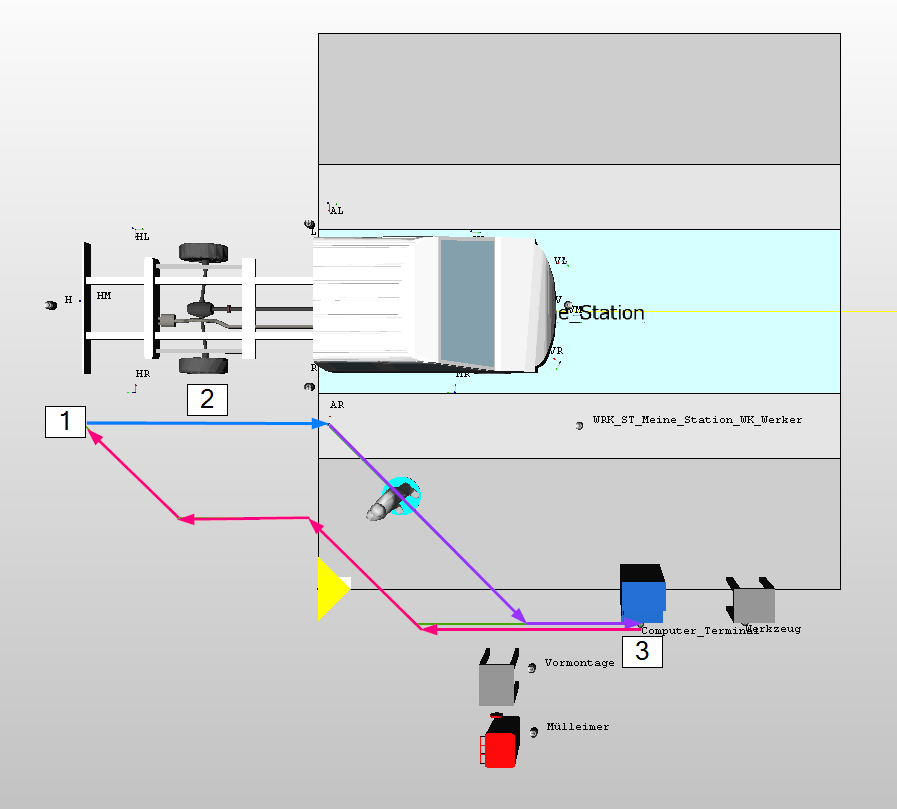
In this example, the worker prints out a label (e.g. chassis number) from a computer terminal and attaches it to the vehicle.
- The worker starts where he installs the material - station (Meine_Station) and work position (work position AR on the product). During the implementation of the task / working cycle (A002) he walks with the product (blue line) for the max duration [s] (150 seconds) and attaches the label.
- When all tasks for this cycle are completed, the worker retrieves the material for the next cycle. In our example he gets the label with the chassis number material (M002). He walks (purple line) to the computer terminal with the printer - pick point (Computer_Terminal) and prints the label there in 20s - pick time [s] (20). A pick point can be any work point previously created in the Layout Editor.
- He removes the label material (M002) from the printer and returns to the starting point (magenta line) so that he can immediately start again with the next cycle.
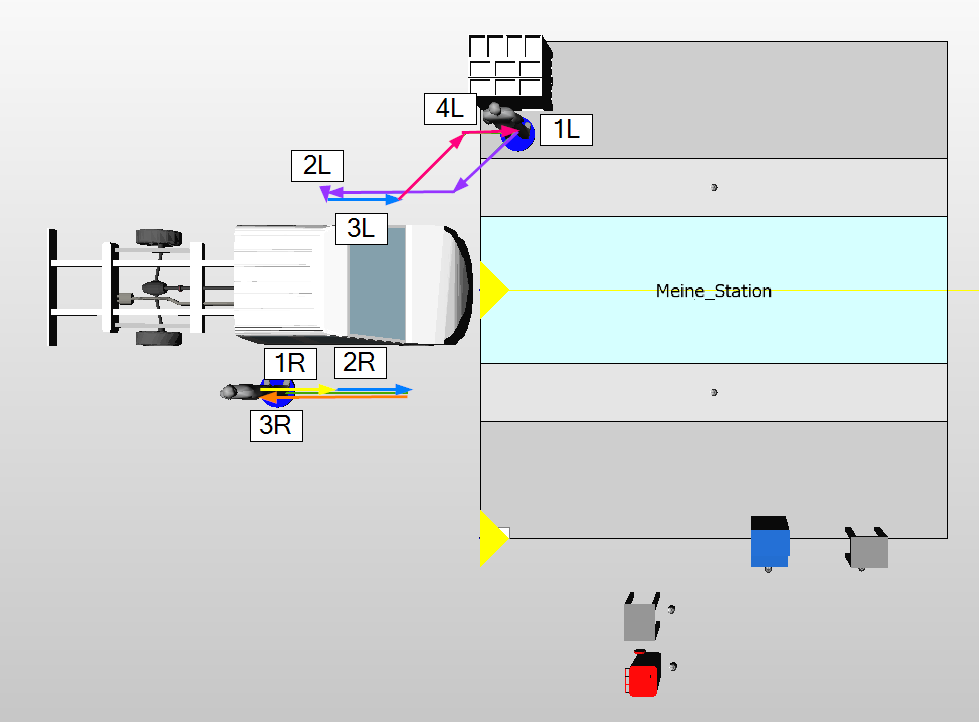
3. Retrieving and installing material from a carset
| Column Name | Value |
| Station | Meine_Station |
| Worker | Worker |
| Product | Cargo Van |
| Working cycle | A001 |
| Working cycle - description (optional) | Headlight attachment |
| Max duration [s] | 20 |
| Arrangement | right |
| Operating position | MR |
| Material | M003 |
| Material description (optional) | Right headlight |
| pick point (of the Material) | H [= rear] |
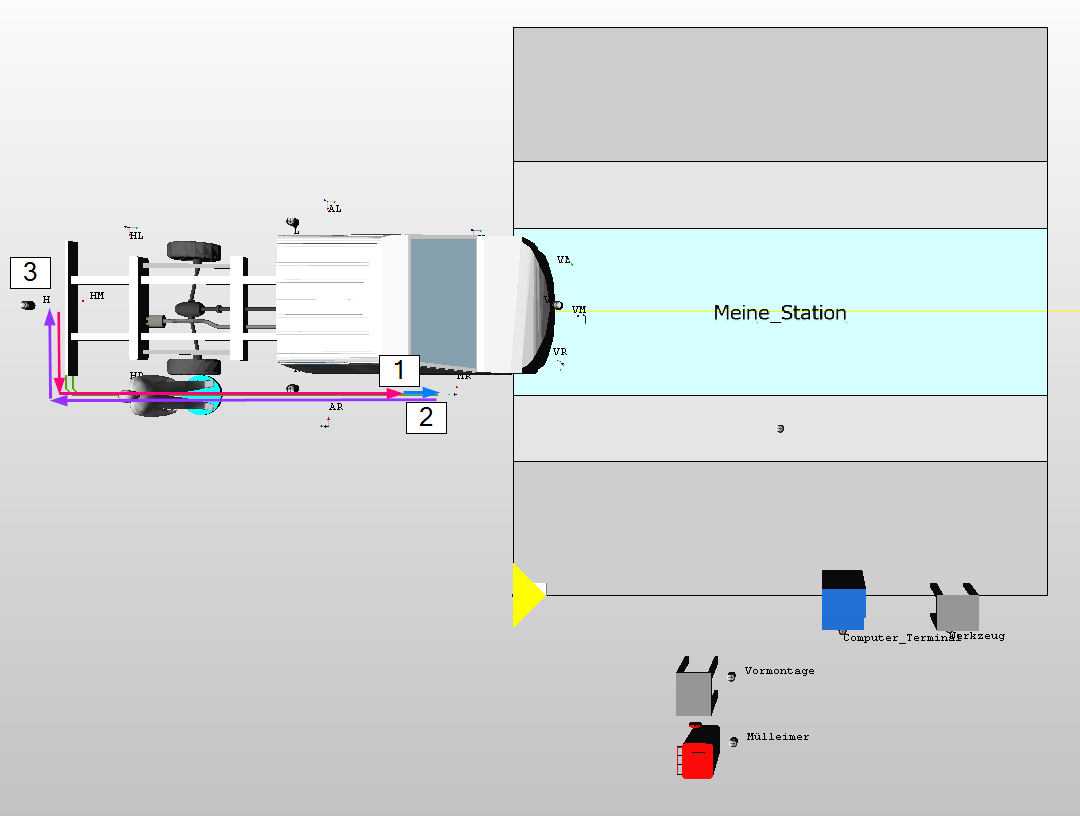
In this scenario we will install a material that moves along with the product on the line. This is not shown in 3D here, but can be visualized with the product geometry. In our example, the material is located at the back of the product.
- The worker starts where he installs the material - station (Meine_Station) and work position (work position MR on the product). During the implementation of the task / working cycle (A001), he walks along with the product (blue line) for the max duration [s] (20 seconds) and attaches a headlight.
- When all tasks for this cycle are completed, the worker retrieves the material for the next cycle. In our example, he gets the headlight material (M003). He walks (purple line) to the cart at the product - material pickup point (H) and picks up a headlight there.
- He then returns to the starting point (magenta line) so that he can immediately start again with the next cycle.
4. Installing material at the work position (pre-assembly)
| Column Name | Value |
| Station | Meine_Station |
| Worker | Worker |
| Product | Cargo Van |
| Working cycle | A001 |
| Working cycle - description (optional) | Screws |
| Max duration [s] | 20 |
| Arrangement | right |
| Operating position | Pre-assembly |
| Material | M001 |
| Material description (optional) | Screw M4 |
| Box type | 1211-KLT-GB-1040 |
| Box count | 1 |
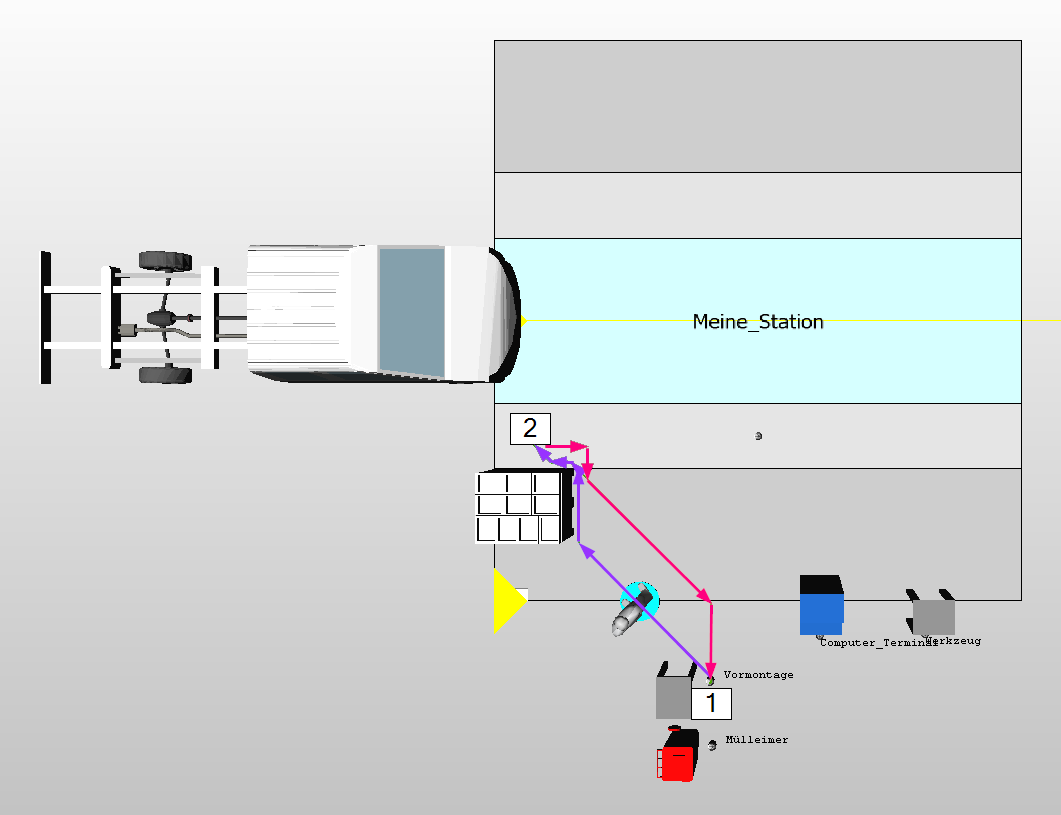
In this example, the worker performs pre-assembly at a separate workstation.
- The worker starts where he assembles the material - station (Meine_Station) and workstation ("Pre-assembly" work point). This point was previously created in the Layout Editor in the form of a work point. During the implementation of the task / working cycle (A001), it is located at point 1 for the max duration [s] (20 seconds).
- When all AVOs for this cycle are completed, the worker gets the material for the next cycle. In our case he gets the material (M001). He walks (purple line) to the container - container type (1211-KLT-GB-1040).
- He takes the material (M001) and returns to the starting point (magenta line), so that he can start again immediately with the next cycle.
5. Multiple Workers
Row 1:
| Column name | Value |
| Station | Meine_Station |
| Worker | Werker_1 |
| Product | Cargo Van |
| Working cycle | A001 |
| Working cycle - description (optional) | Screws |
| Max duration [s] | 20 |
| Arrangement | right |
| Operating position | AR |
| Material | M001 |
| Material description (optional) | Screw M4 |
| Box type | 1211-KLT-GB-1040 |
| Box count | 1 |
Row 2:
| Column Name | Value |
| Station | Meine_Station |
| Worker | Werker_2 |
| Product | Cargo Van |
| Working cycle | A002 |
| Working cycle - description (optional) | Screws |
| Max duration [s] | 20 |
| Arrangement | links |
| Operating position | AL |
| Material | M002 |
| Material description (optional) | Screw M6 |
| Box type | 3215 |
| Box count | 1 |
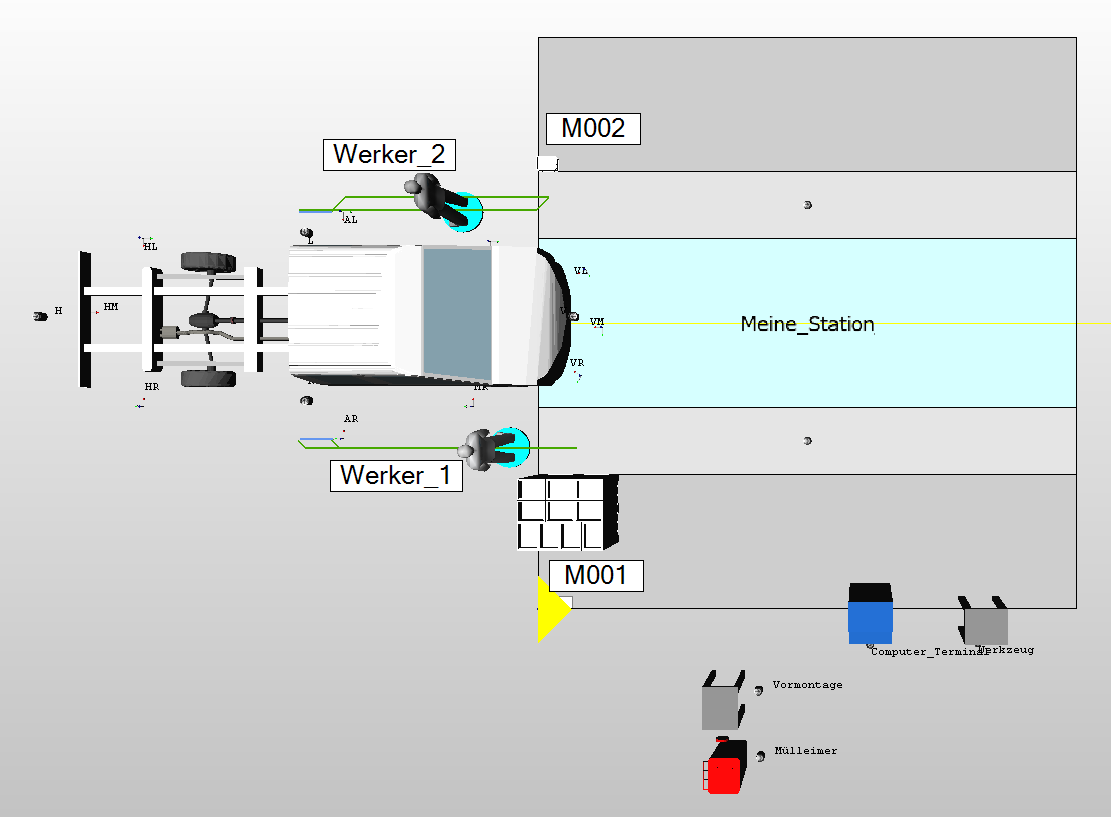
The purpose of this example is to show how several workers can be assigned to one station. Since a worker cannot exist without an task, this Excel therefore consists of two rows.
- Row 1 refers to the first worker (Werker_1). The decisive factor here is:
- The ID Worker (Werker_1) of the worker on the station (Meine_Station).
- The arrangement (right), which defines on which side of the station the worker is located at the beginning of the cycle.
- With the arrangement (right), the material (M001) also follows on the right station side
-
Row 2 refers to the worker_2:
-
The ID worker (Worker_2) of the worker on the station (Meine_Station).
- The arrangement (left), which defines on which side of the station the worker is located at the beginning of the cycle.
- With the arrangement (left), the material (M002) also follows to the left station side
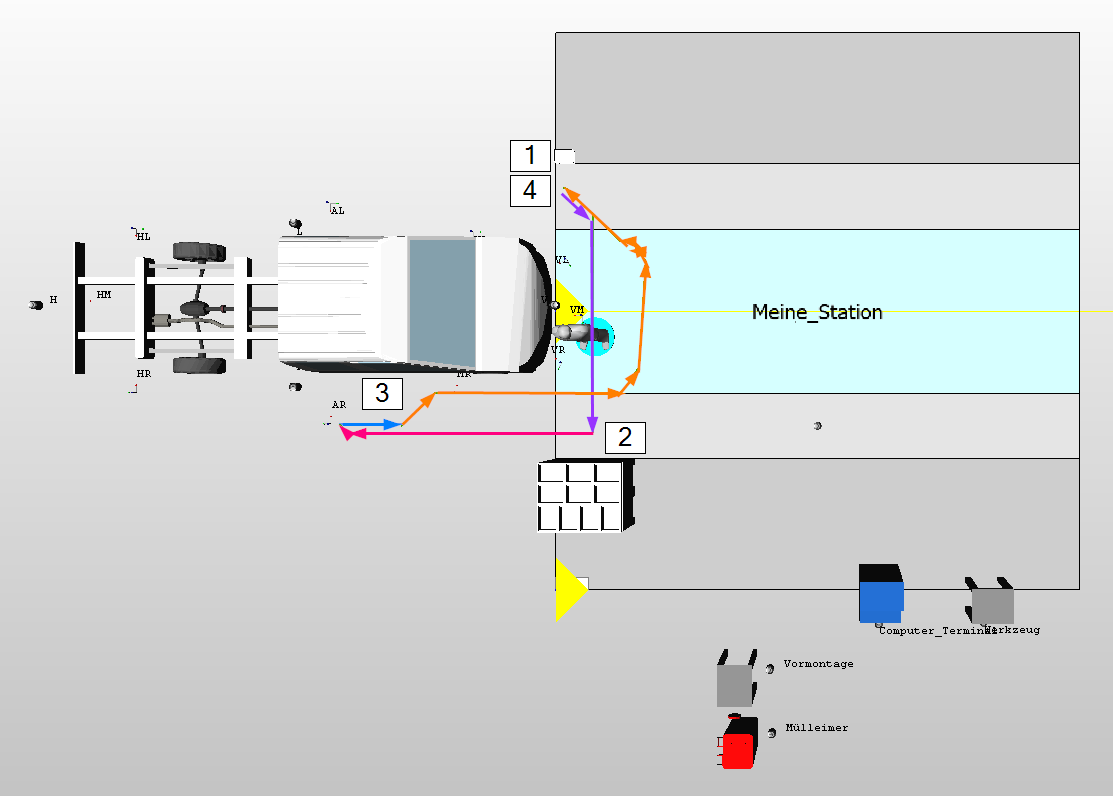
6. Tools
| Column Name | Value |
| Station | Meine_Station |
| Worker | Worker |
| Product | Cargo Van |
| Working cycle | A001 |
| Working cycle - description (optional) | Screws |
| Max duration [s] | 20 |
| Arrangement | right |
| Operating position | AR |
| Tool | drill |
| Material | M001 |
| Material description (optional) | Screw M4 |
| Box type | 1211-KLT-GB-1040 |
| Box count | 1 |
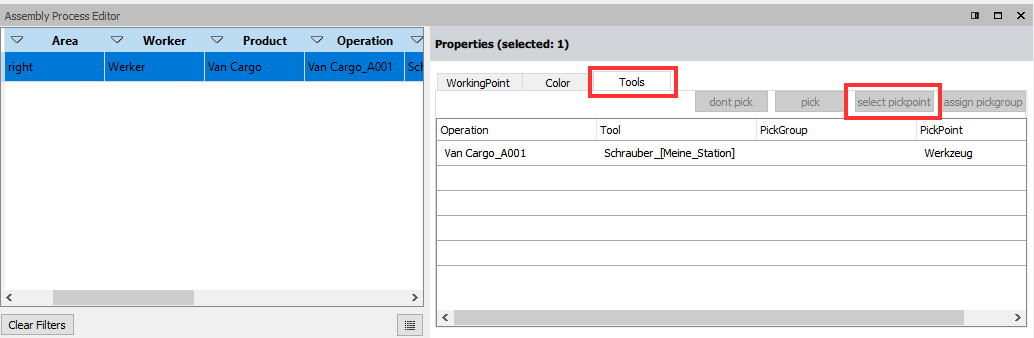
In this example, a worker fetches a drill to fasten screws.
Important:
A prerequisite for the worker to actually fetch the tool is that a pickpoint in the form of a work point has been assigned to the tool in the Assembly Process Editor. A work point can be created in the Layout Editor.
- The worker starts at the tool pickup point assigned in the Assembly Process Editor (tool) and then walks with the tool to the install location work position (AR) (purple line).
- The worker assembles the material (M001) using the tool (drill) on station (Meine_Station) and work position (AR). During the implementation of the working cycle (A001), he walks with the product (blue line) for Max Duration [s] (20 seconds).
- After the working cycle (A001) is finished, he returns the tool to the tool pick point (tool) - (magenta line).
- He then gets the material for the next cycle and walks (orange line) to the container (1211-KLT-GB-1040) that contains the material (M001).
- He removes the material (M001) from the box (1211-KLT-GB-1040) and returns to the product (orange line) so that he can immediately start the next cycle.
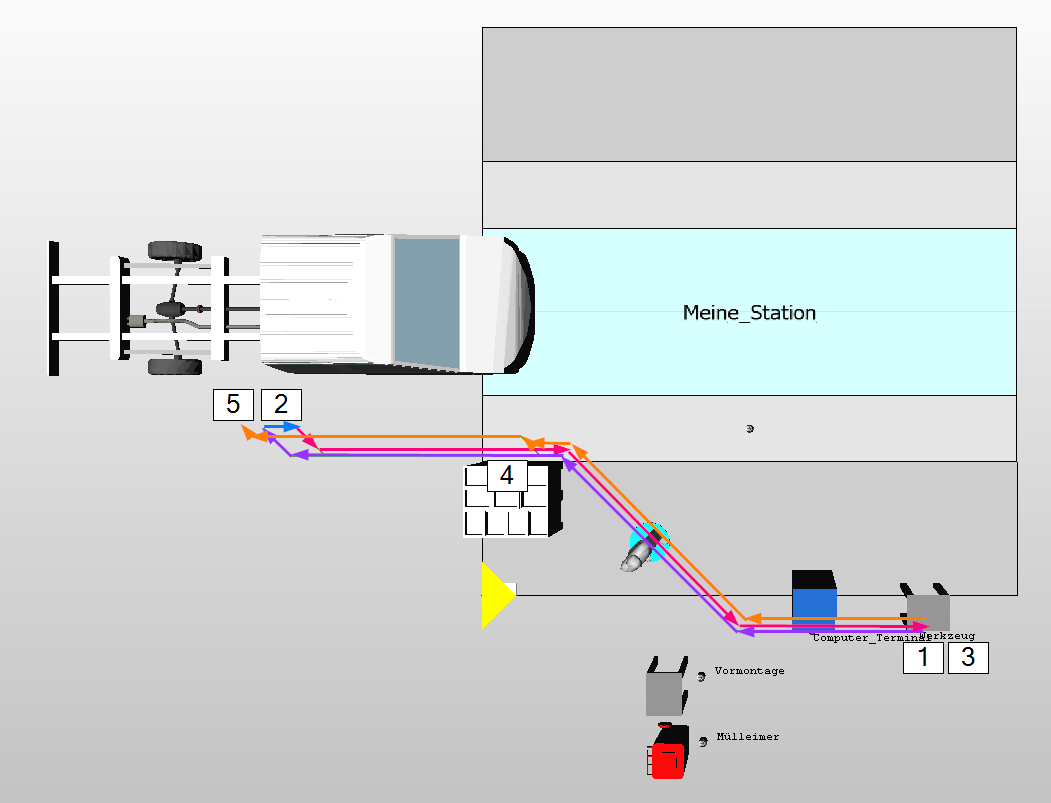
7. Material Pick Groups
Row 1:
| Column Name | Value |
| Station | Meine_Station |
| Worker | Worker |
| Product | Cargo Van |
| Working cycle | A001 |
| Working cycle - description (optional) | positioning of lid |
| Max duration [s] | 20 |
| Arrangement | right |
| Operating position | AR |
| Material | M001 |
| Material description (optional) | Lid |
| Box type | 1211-KLT-GB-1040 |
| Box count | 1 |
| pick group | G1 |
Row 2:
| Column name | Value |
| Station | Meine_Station |
| Worker | Worker |
| Product | Cargo Van |
| Working cycle | A002 |
| Working cycle - description (optional) | screw on lid |
| Max duration [s] | 20 |
| Arrangement | right |
| Operating position | AR |
| Material | M002 |
| Material description (optional) | Screw M4 |
| Material area | Meine_Station_ML |
| Box type | 3215 |
| Box count | 1 |
| pick group | G1 |
In this example, the worker performs several processes for which he has to get all the necessary materials beforehand. To ensure that the worker does not retrieve the materials at the end of the cycle but rather during it, there is the column "pick group" in the Excel sheet. All materials in this pick group are obtained directly one after the other by the worker (before the task).
- Excel Row 2: The worker starts at the material (M002) in the material retrieval group (G1) and removes it from the box. The box (3215) here is now on the left side of the station (contrary to the previous logic) because a material area (Meine_Station_ML) was entered. This overwrites the content of the arrangement field. The worker is still assigned to the right station side due to the arrangement field (right).
- Excel Row 1: Subsequently, the worker (purple line) walks to material (M001) and takes it from the box (1211-KLT-GB-1040). With both materials, he goes to the installation location (magenta line).
- At the installation location - work point (AR), he walks with the product (blue line) and performs the tasks (A001 and A002).
- He then returns to the starting point (orange line) so that he can immediately start again with the next cycle.
8. Sequences
Row 1:
| Column Name | Value |
| Station | Meine_Station |
| Worker | Worker |
| Product | Cargo Van |
| Working cycle | A001 |
| Working cycle - description (optional) | positioning of lid |
| Max duration [s] | 20 |
| Arrangement | right |
| Operating position | AR |
| Material | M001 |
| Material description (optional) | Lid |
| Sequence | SEQ1 |
| Box type | 1211-KLT-GB-1040 |
| Box count | 1 |
Row 2:
| Column Name | Value |
| Station | Meine_Station |
| Worker | Worker |
| Product | Cargo Van |
| Working cycle | A002 |
| Working cycle - description (optional) | screw on lid |
| Max duration [s] | 20 |
| Arrangement | right |
| Operating position | AR |
| Material | M002 |
| Material description (optional) | Screw M4 |
| Sequence | SEQ1 |
| Box type | 1211-KLT-GB-1040 |
| Box count | 1 |
sequenz.png
Sequences allow the placement of several parts in one container. For this purpose there is the field Sequence. You can check the correct placement using a tooltip in the 3D view or the material zone editor.
Important:
To ensure correct performance, all rows of material inside the same sequence should have identical values for material placement in the Excel (green columns). Except of course material and material description!
9. Multiple parts per operation (task / working cycle)
Row 1:
| Column Name | Value |
| Station | Meine_Station |
| Worker | Worker |
| Product | Cargo Van |
| Working cycle | A001 |
| Working cycle - description (optional) | Positioning and screwing lid |
| Max duration [s] | 20 |
| Arrangement | right |
| Operating position | AR |
| Material | M001 |
| Material description (optional) | Lid |
| Sequence | SEQ1 |
| Box type | 1211-KLT-GB-1040 |
| Box count | 1 |
Row 2:
| Column Name | Value |
| Station | Meine_Station |
| Worker | Worker |
| Product | Cargo Van |
| Working cycle | A001 |
| Working cycle - description (optional) | Positioning and screwing lid |
| Max duration [s] | 20 |
| Arrangement | right |
| Operating position | AR |
| Material | M002 |
| Material description (optional) | Screw M4 |
| Sequence | SEQ1 |
| Box type | 1211-KLT-GB-1040 |
| Box count | 1 |
If you want to install several parts per operation, simply copy the operation including the associated values (blue in Excel) and enter different materials under Material. This can be checked in the Worker Gantt using the tooltip for the AVO.
10. Synchronization point
Row 1:
| Column Name | Value |
| Station | Meine_Station |
| Worker | L |
| Product | Cargo Van |
| Working cycle | A001 |
| Working cycle - description (optional) | Attach window on the left side |
| Max duration [s] | 50 |
| Arrangement | left |
| Operating position | AL |
| Synchronization point | S1 |
| Material | M001 |
| Material description (optional) | Window |
| Box type | 1211-KLT-GB-1040 |
| Box count | 1 |
| pick time [s] | 40 |
| Material retrieval group | G1 |
Row 2:
| Column Name | Value |
| Station | Meine_Station |
| Worker | R |
| Product | Cargo Van |
| Working cycle | A002 |
| Working cycle - description (optional) | Attach window on the right side |
| Max duration [s] | 50 |
| Arrangement | right |
| Operating position | AR |
| Synchronization point | S1 |
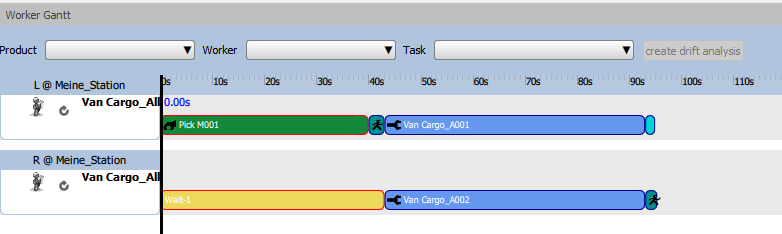
Synchronization points are required when a worker has to wait for another worker to finish their previous task. This is necessary, for example, when installing a windshield, if one worker fetches it for example with a handling device and both workers then install it together.
- The worker (L) starts at 1L and removes the piece of material (M001) there using the handling device. To ensure that this happens before the installation operation, a pick group (G1) has been specified.
- The worker then goes to the working position (AL) (purple line) and starts with the AVO (A001).
- At the same time, worker (R) waits at 1R for worker (L) to retrieve the piece (yellow line). Waiting is displayed as non-productive time in the Worker Gantt in yellow.
- As soon as worker (L) starts with AVO (A001), which has the same synchronization point (S1) as AVO (A002) of worker (R), worker (R) also starts with AVO (A002).
- Afterwards both go back to the starting point.